Overview
This document provides a guide to locating BusinessObjects (BO) 4.2 functions when working on a report in Design mode in the upgraded BO 4.3 environment. It lists all of the BO 4.2 toolbars and contextual menus, and explains where each item is in BO 4.3. You can use the Contents to jump to a specific toolbar or menu.
This is a detailed reference document intended to help users transition from BusinessObjects 4.2 to BusinessObjects 4.3. If you are looking for a high-level overview of BO 4.3 changes, see the Business Objects v4.3 Overview of Changes.
Reading mode: If you are working on reports in Reading mode, a BusinessObjects 4.3 - Function Changes (Reading Mode) document is available.
File Tab
BO 4.2 Toolbar - File tab - Each function is listed below with an explanation of its BO 4.3 location.
New
From BI Launch Pad, click Web Intelligence.
Open
From BI Launch Pad, navigate to the report and open it.
Save / Save As
On toolbar - File > Save or Save As
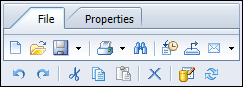
The image below shows where Save and Save As are on the toolbar:

When using Save As, the options are the same, however the layout of the Save As screen has changed.
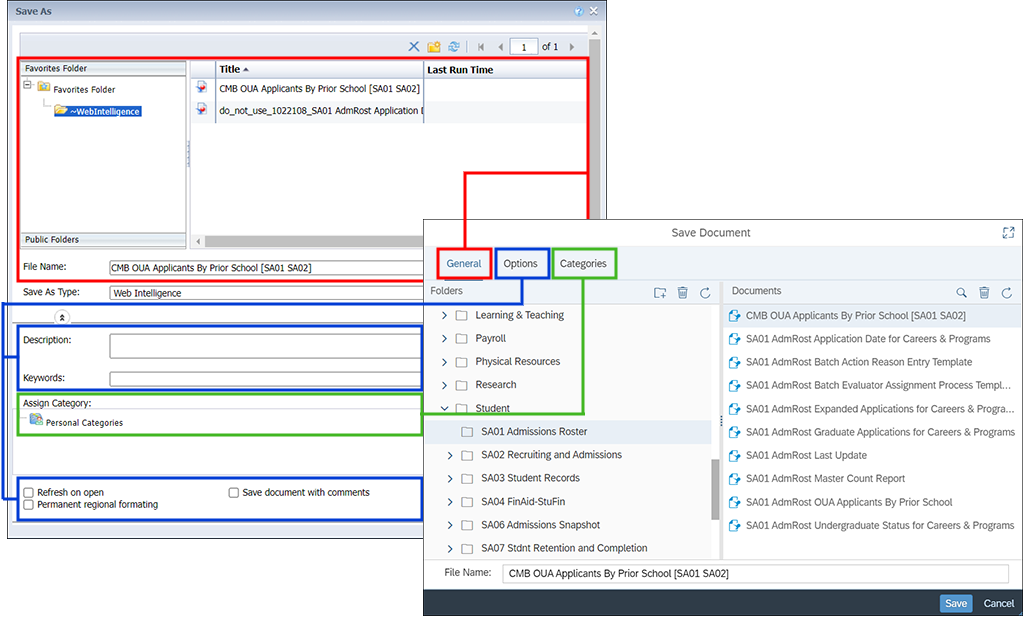
BO 4.3 divides the Save As options into three separate tabs, compared to all options being on one screen in BO 4.2. The folder structure and file name fields are on the General tab. The description, key words, and setting checkboxes are on the Options tab. The Assign Categories selection is on the Categories tab.
On toolbar - File > More > Print.
The image below shows where Print is on the toolbar:

When using Print, the options are the same, however the layout of the Print screen is different.
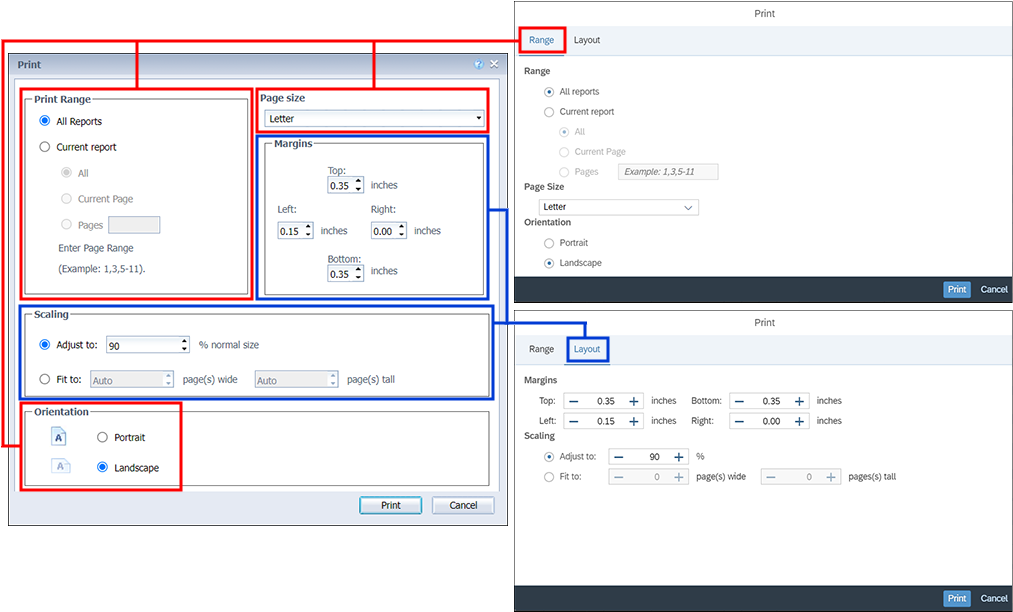
BO 4.3 divides the Print options into two screens. The Print Range, Page Size, and Orientation options are on the Range tab. The Margins and Scaling options are on the Layout tab.
Find
Use browser's Find function.
History
From BI Launch Pad, navigate to the document, click More > History.
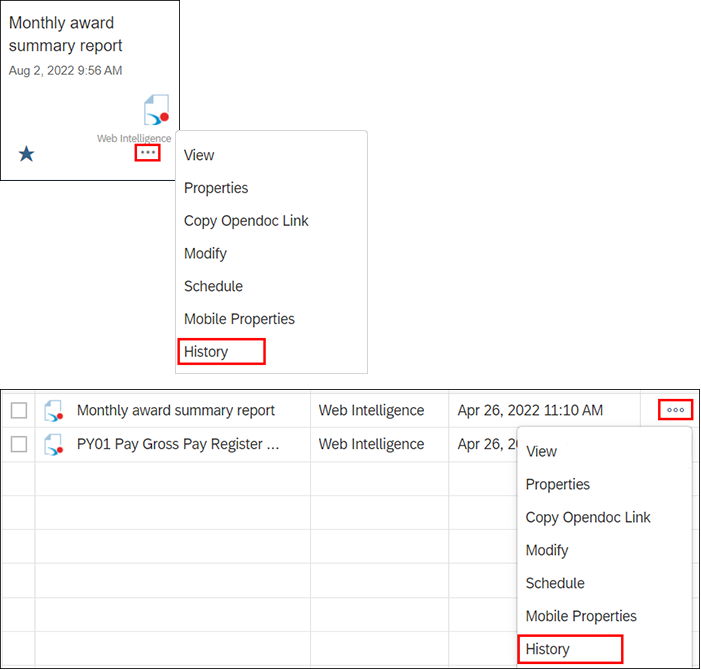
The image above shows the two different ways to access a report's History. If there is a tile available for the report, click the three-dot menu and select History. If you are viewing reports in a grid format, click the three-dot menu on the report row and select History.
Export
On toolbar - File > More > Export.
The image below shows where Export is on the toolbar:

BO 4.3 has removed the Excel .xls option and added an HTML option; other options remain the same. The layout of the Export screen is different.
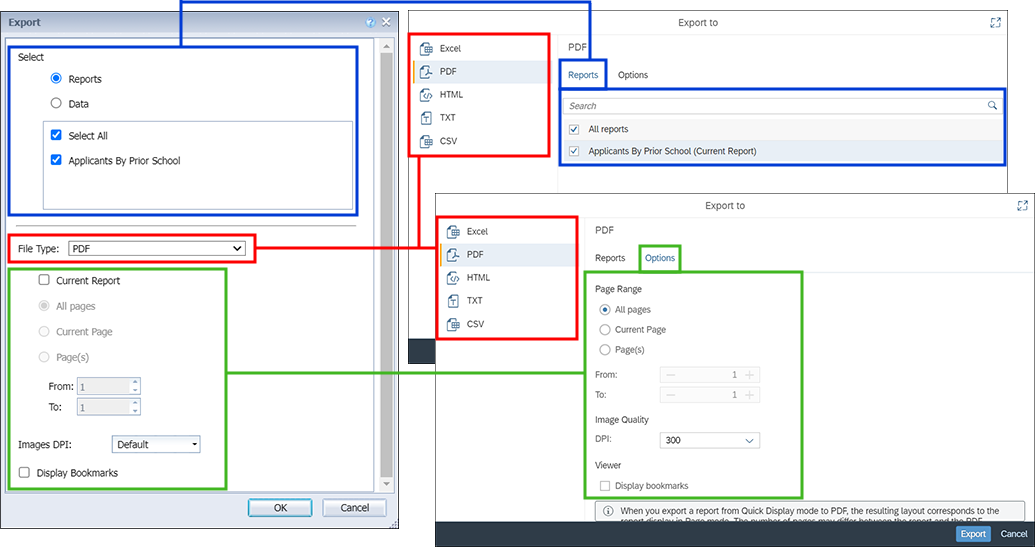
The Export screen in BO 4.3 has been redesigned. The file export formats are in a left-hand panel rather than a drop-down list. Once a format is chosed, the report selection is on the Reports tab. The various settings related to the chosen file format, such as page range, are on the Options tab.
Send To
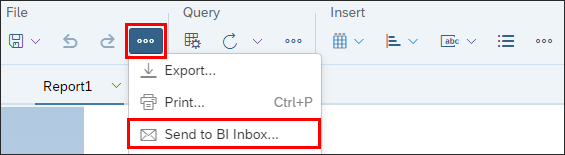
On toolbar - File > More > Send to BI Inbox.
The image below shows where Send to BI Inbox is on the toolbar:
There are no longer mail and FTP options. The interface has changed both in how individuals are selected (BO 4.3 uses checkboxes) and how options are displayed.
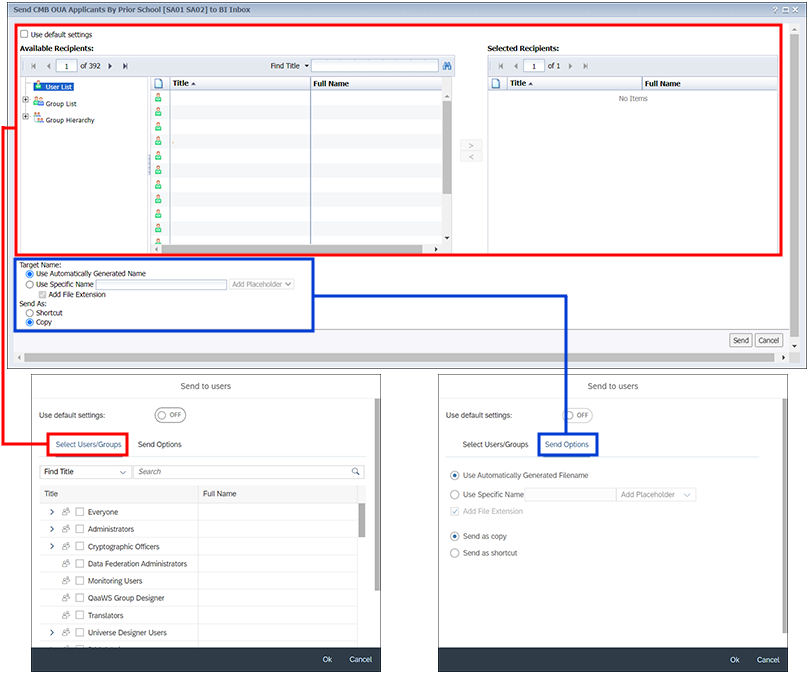
The screen for sending a report to a BI Inbox has been redesigned. You search for and select users on the Select Users/Groups tab in BO 4.3. As with similar selection screens, the move arrows have been replaced with checkboxes. The options for setting a target name and the type of file to send (copy or shortcut) are now on the Send Options tab.
Undo / Redo
On toolbar - File > Undo and File > Redo.
The image below shows where Undo and Redo are on the toolbar:

Cut / Copy / Paste
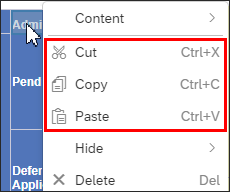
Use standard keyboard shortcuts or select from a contextual menu.
The image above shows the contextual menu when a data cell is selected. The menu differs based on the selected element; however, if available, Cut, Copy and Paste are still near the top of each contextual menu.
Remove
Use keyboard's Delete button or select from a contextual menu.
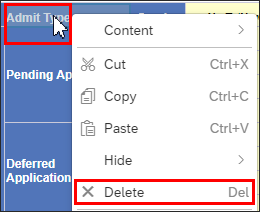
The image above shows the contextual menu when a data cell is selected. The menu differs based on the selected element; however Delete is still near the top of each contextual menu.
Edit Data Provider
On toolbar - Query > Edit
The image below shows the location of Edit on the toolbar:

The Query Panel that displays is the same as in BO 4.2 with the exception of button and tab locations.

There are minor differences between the Query Panel screens. In BO 4.3, the buttons for Run, Apply Changes and Close (no longer under the Close drop-down list), and Cancel (replaces Revert Changes and Close option under the Close drop-down list) are at the bottom of the screen. If a report has multiple queries, they are listed near the top of the screen in BO 4.3.
Refresh
On toolbar - Query > Refresh
The image below shows the location of Refresh on the toolbar:

The drop-down list has options to refresh all the queries, or an Advanced refresh which allows for refresh of specific queries. The Prompts screen that displays has the same options but in a different interface.
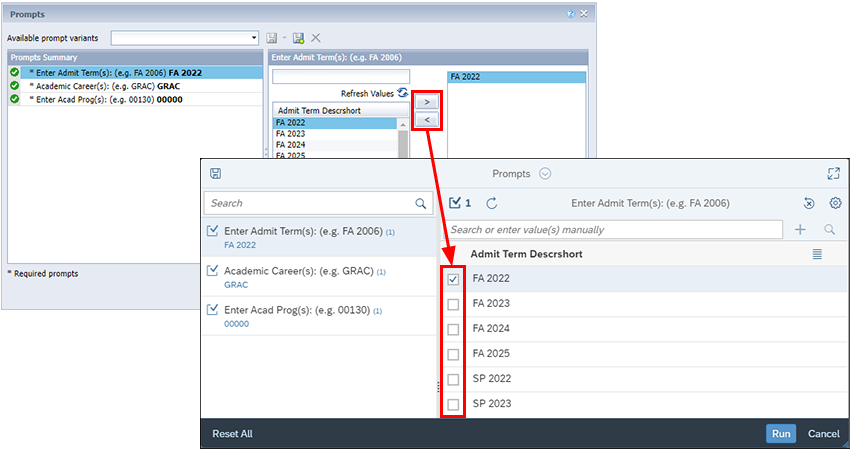
The image above shows the look and feel difference between the BO 4.2 Prompts window and the BO 4.3 Prompts window. The highlighted areas show the change between using arrows to select values and using checkboxes.
Properties Tab
BO 4.2 Toolbar - Properties tab - Each function is listed below with an explanation of its BO 4.3 location.
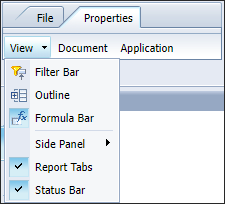
View Drop-Down List
The image below shows the location of Filter Bar on the toolbar:

The Filter Bar shows currently applied filters. BO 4.3 does not have the option to add simple report filters from the Filter Bar. Filters are added from the Properties panel.
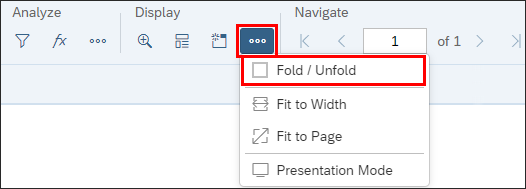
The image below shows the location of Fold/Unfold on the toolbar:
The image below shows the location of Formula Bar on the toolbar:

The image below shows the location of the Main Panel icon which opens and closes the panel:

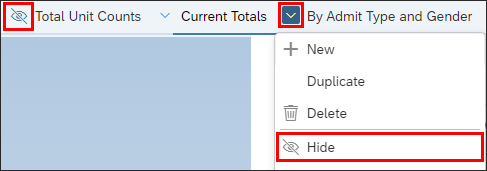
Individual report tabs can be hidden in BO 4.3 by selecting Hide from the drop-down list in the report tab. If a tab is hidden, it has the Hide icon next to its name:
Document
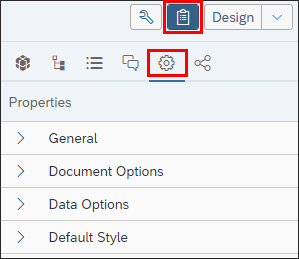
On Main Panel > Show Document Properties
Application (Measurement Unit setting)
In user preferences. From BI Launch Pad, click the circle with your initial in the upper-right corner, select Settings, and click the Application Preferences tab to change the Measurement Unit setting.
Report Elements Tab

BO 4.2 Toolbar - Report Elements tab - Each function is listed below with an explanation of its BO 4.3 location.
Tables Tab
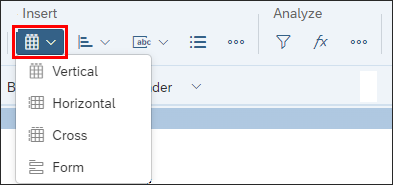
Define Vertical Table, Define Horizontal Table, Define Cross Table, and Define Form - On toolbar - Insert > Insert Table > Vertical/Horizontal/Cross/Form.
The image below shows the location of the four table types on the toolbar:
Cell Tab
Blank and Pre-defined drop-down list - On toolbar - Insert > Insert Cell.
There is not a separate Blank button in BO 4.3. This is included in the pre-defined options in the Insert Cell drop-down list, as shown below:

Section Tab
On toolbar - Insert > Insert Section
The image below shows the location of Comment on the toolbar:
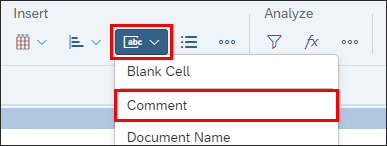
Chart Tab
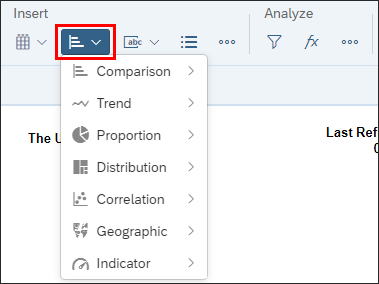
On toolbar - Insert > Insert Chart
The image below shows the location of Insert Chart on the toolbar and the various chart options:
Once the chart is added to the report, the process of adding data has changed between BO 4.2, where objects are dragged into the chart, and BO 4.3, where objects are dragged between side panels.

In BO 4.2, objects are dragged from the Available Objects sidebar and dropped directly onto the chart.
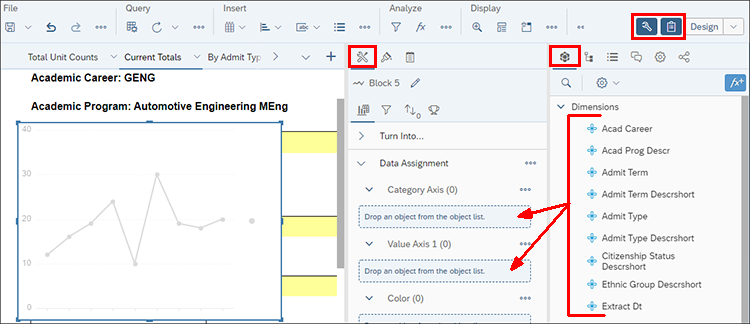
When a chart is added to a report in BO 4.3, the Properties Panel opens, showing the Report Element Data, which lists the individual parts of the chart. You need to open the Main Panel > Document Objects, then drag and drop the desired object into the appropriate place in the chart on the Report Element Data panel.
Tools Tab
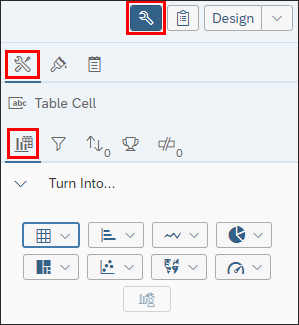
The image below shows the location of Turn Into on the Properties panel
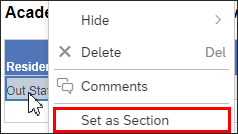
The image below shows Set as Section as is displays in a cell's contextual menu:
You can also use the Insert Section button in the Insert section of the toolbar. However, it does not automatically create the section based on the selected cell; you need to specify where the section is inserted and define the data.
Position Tab
The image below shows the contextual menu that displays when you right click on an element. Selecting Order displays the order options.

The image below shows the contextual menu that displays when you right click on multiple selected elements. Selecting Align displays the alignment options.

Linking Tab
The image below shows the contextual menu that displays when you right click on an element. Selecting Hyperlink displays the Add Hyperlink option.
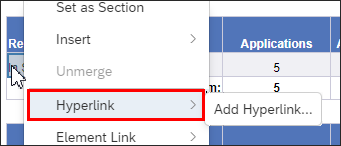
BO 4.3 does not have separate configuration windows for linking to web pages and documents. All settings are on a single window.
Right-click on element and select Element Link
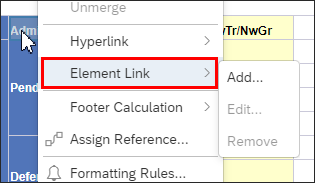
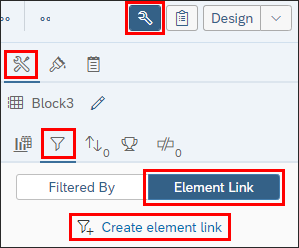
or... Properties panel > Report Element Data > Element Link
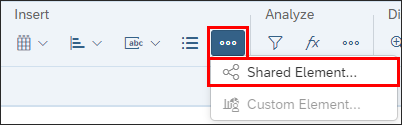
Right-click on element and select Shared Element > Save As...
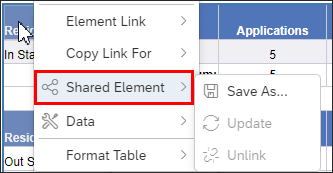
The image below shows how to access Shared Element from the toolbar:
If an element has already been used in a document and needs to be inserted elsewhere in that document, use the Main Panel > Shared Elements Panel. Click the three-dot More menu and select Insert:
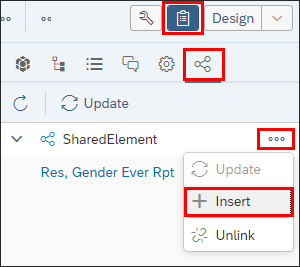
Table Layout Tab
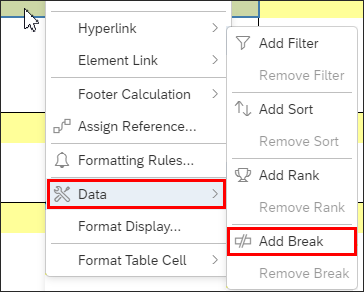
Right-click on element and select Data > Add Break
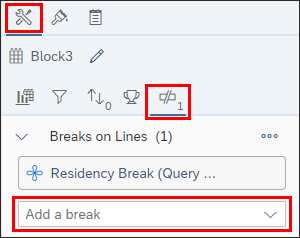
Properties panel > Report Element Data > Break Panel
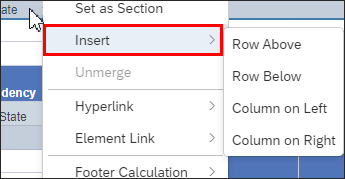
The image below shows how to access Insert and its sub-choices from a contextual menu:
Properties Panel > Report Element Data > Break Panel
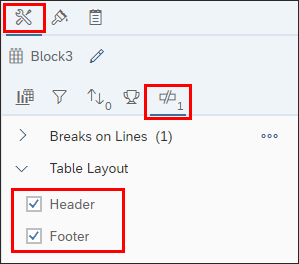
Properties Panel > Report Element Format > Display Settings
Behaviors / Cell Behaviors / Section Behaviors Tabs
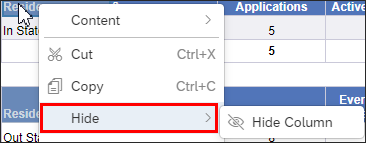
Right-click on table and select Hide
Properties Panel > Report Element Format > Display Settings
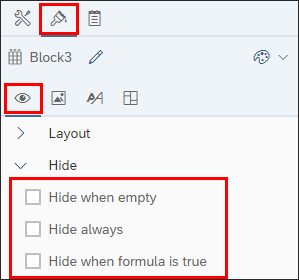
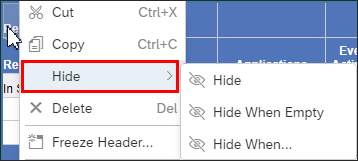
The image below shows how to access Hide from a cell's contextual menu:
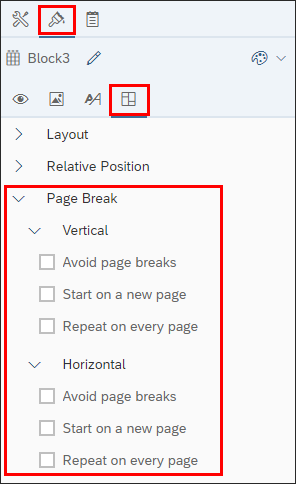
The image below shows how to access Page Break and Repeat from the Layout Settings panel
Section Layout Tab
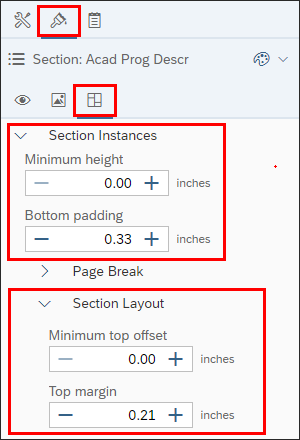
The Minimum Height setting is on Properties Panel > Report Element Format > Layout Settings
The image below shows how to access the Minimum Height settings on the Layout Settings panel
Formatting Tab

BO 4.2 Toolbar - Formatting tab
Formatting Options
Formatting options are on Properties Panel > Report Element Format panel.
The image below shows the Report Element Format panel as it looks when a cell is selected. The sub-tabs and settings are different depending on the type of element selected (e.g., cell, table, section):
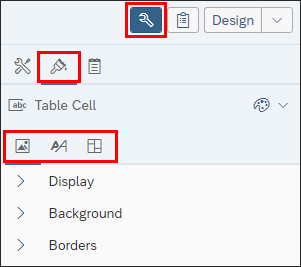
When a cell is selected, as in this example, there are three tabs - Appearance Settings , Text Settings , and Layout Settings.
Data Access Tab

BO 4.2 Toolbar - Data Access tab - Each function is listed below with an explanation of its BO 4.3 location
Data Providers Tab
The image below shows the location of Edit in the Query section of the toolbar:

The Query Panel that displays is the same as in BO 4.2 with the exception of button and tab locations.
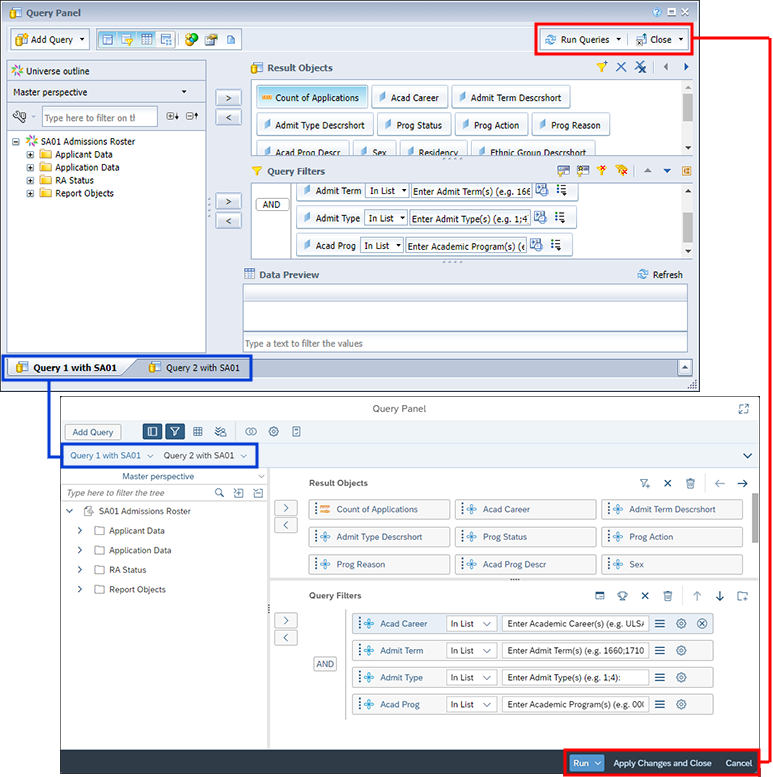
There are minor differences between the Query Panel screens. In BO 4.3, the buttons for Run, Apply Changes and Close (no longer under the Close drop-down list), and Cancel (replaces Revert Changes and Close option under the Close drop-down list) are at the bottom of the screen. If a report has multiple queries, they are listed near the top of the screen in BO 4.3.
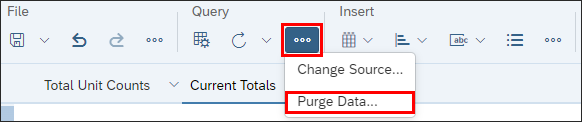
The image below shows the location of Purge Data in the Query section of the toolbar under the More menu:
The image below shows the location of Refresh in the Query section of the toolbar:

The drop-down list has options to refresh all the queries, or an Advanced refresh which allows for refresh of specific queries. The Prompts screen that displays has the same options but in a different interface.

The image above shows the look and feel difference between the BO 4.2 Prompts window and the BO 4.3 Prompts window. The highlighted areas show the change between using arrows to select values and using checkboxes.
Tools Tab
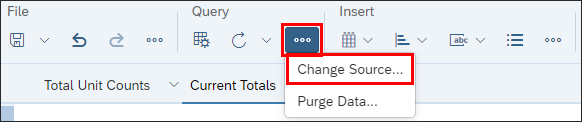
On toolbar - Query > More > Change Source.
The image below shows the location of Change Source in the Query section of the toolbar under the More menu:
Data Objects Tab
Main Panel > Document Objects > More > Add a new variable
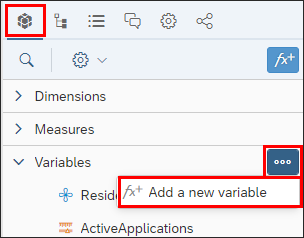
or... Create New Variable on the Formula Bar
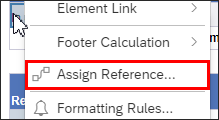
The image below shows how to access Assign Reference from a contextual menu:
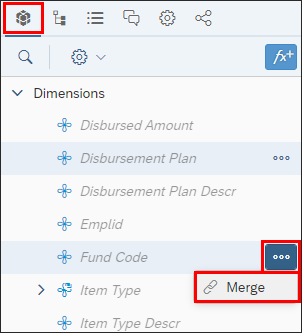
The image below shows the Documents panel and how you access Merge once multiple dimensions are selected.
Analysis Tab

BO 4.2 Toolbar - Analysis tab - Each function is listed below with an explanation of its BO 4.3 location.
Filters Tab
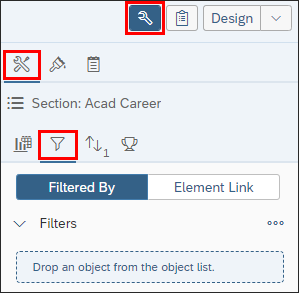
The image below shows how to access Filters on the Filter panel.
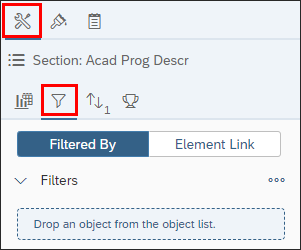
NOTE: Filter is also available from the contextual menu by selecting Data > Add Filter, which opens the panel shown above.
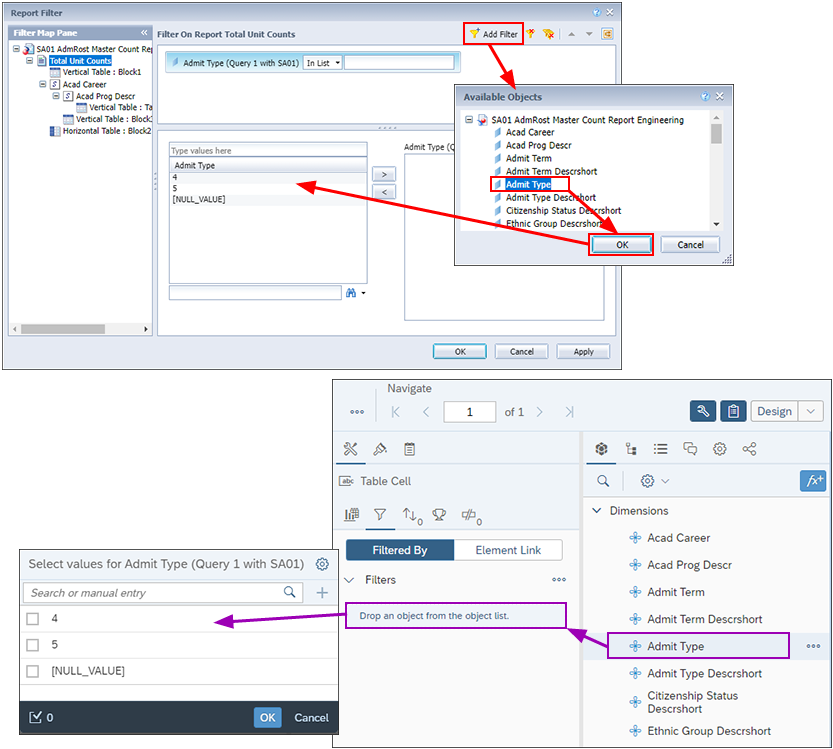
A new filter is created in BO 4.3 by dragging the filter element from the Main Panel > Document Objects onto the Filter panel then configuring the data in the window that displays.
The image above shows the functionality difference between the BO 4.2 Filters window and the BO 4.3 Filters panel. In BO 4.2, you click Add Filter, select the filter element on the Available Objects window, click OK, and configure the data on the Report Filter window. In BO 4.3, the filter element is dragged from the Document Objects panel to the Filters panel. Once dropped onto the Filter panel, a configuration window displays.
The image below shows how to access Ranking on the Ranking panel
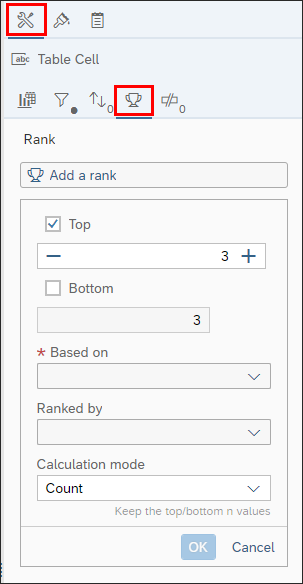
NOTE: Rank is also available from the contextual menu by selecting Data > Add Rank, which opens the panel shown above.
The image below shows how to access New Input Control from the Filter Bar:
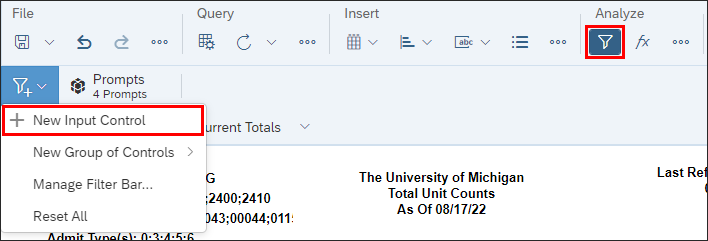
Input Controls in BO 4.3 are configured on a single window, rather than the multiple windows used in BO 4.2.
Data Tracking Tab
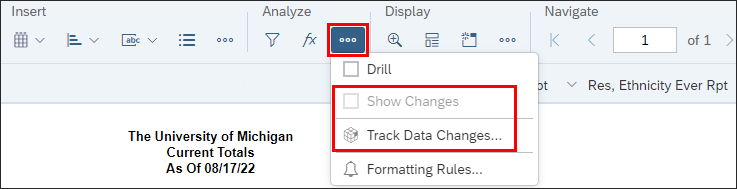
Track and Show Changes - On toolbar - Analyze > More > Track Data Changes and Show Changes.
The image below shows how to access Show Changes and Track Data Changes from the More menu in the Analyze section of the toolbar:
Display Tab
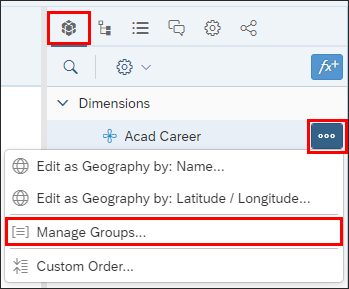
The image below shows how to access Manage Groups from the More menu next to an object on the Document Objects panel:
The image below shows how to access Assign Reference from a contextual menu:
The image below shows the Documents panel and how you access Merge once multiple dimensions are selected.
Right-click on an element and select Data > Add Break

or... on the Properties Panel > Report Element Data > Break panel

The image below shows how to add a sort from the Sort panel

Conditional Tab
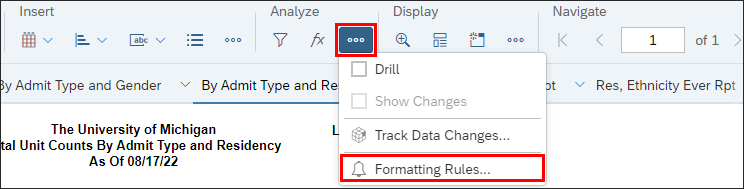
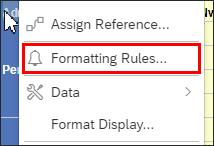
Formatting Rules and New Rule: There are two options. 1. On toolbar - Analyze > More > Formatting Rules, or 2. right-click on element and select Formatting Rules.
The image below shows how to access Formatting Rules from the toolbar:
The image below shows how to access Formatting Rules from the element's contextual menu:
Interact Tab
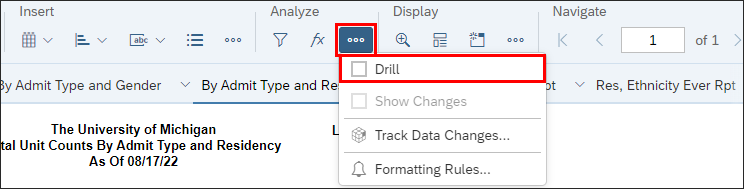
The image below shows how to access Drill from the toolbar:
The image below shows how to access the Filter panel
The image below shows how to access the Fold/Unfold on the toolbar:

Functions Tab
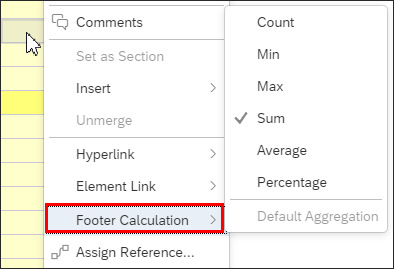
Right-click on the cell and select Footer Calculation > desired option.
The image below shows how to access the Footer Calculation options on the cell contextual menu:
Page Setup Tab

BO 4.2 Toolbar - Page Setup tab - Each function is listed below with an explanation of its BO 4.3 location.
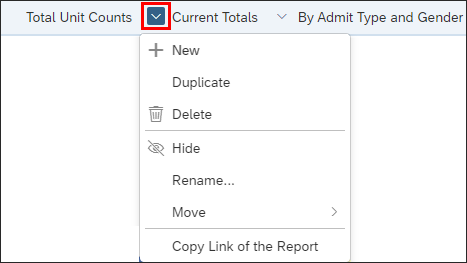
Report Tabs - Report, Report Name, Move Report
In the drop-down list next to the report's name.
The image below shows how to access various report options from the drop-down list next to the report's name:
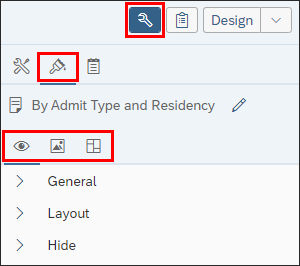
Page, Header, Footer, Scale to Page, Margins, Display
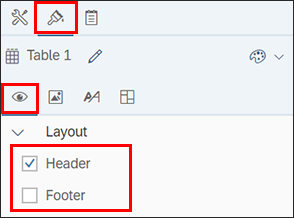
On Properties Panel > Report Element Format > Display Settings panel, Appearance Settings panel and Layout Settings panel
The image below shows the tabs on the Properties Panel that contain the report formatting options:
Contextual Menu Changes
Contextual menus are accessed by right-clicking on a report element. There are four main contextual menus which are based on the type of element selected - Report, Section, Table, and Cell. Each of these are listed below, with explanations of the differences between the 4.2 and 4.3 menus.
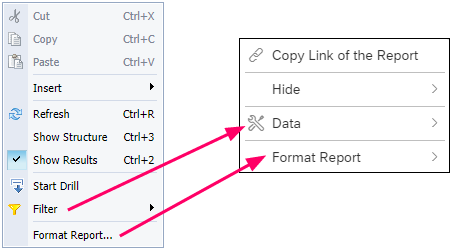
Report Contextual Menu
Options changed from BO 4.2 to BO 4.3:
- Cut, Copy, Paste - Cut and copy options are not available from the menu in BO 4.3. Paste displays in the BO 4.3 menu if there is something on the clipboard that can be pasted.
- Insert - The elements to insert (e.g., table, report element, etc.) are accessed from the Insert section of the BO 4.3 toolbar.
- Refresh - Available on the BO 4.3 toolbar.
- Show Structure / Show Results - Available on Main Panel > Show Report Structure; since this is a panel in BO 4.3, the Show Results option is no longer needed.
- Start Drill - Available in the More menu in the Analyze section of the BO 4.3 toolbar.
Options on both menus:
- Filter / Data - Filter is Data in BO 4.3.
- Format Report
New BO 4.3 option:
- Copy Link of the Report
- Hide - Hides the report.
Section Contextual Menu
Options changed from BO 4.2 to BO 4.3:
- Cut, Copy, Paste - Cut and copy options are not available from the menu in BO 4.3. Paste displays in the BO 4.3 menu if there is something on the clipboard that can be pasted.
- Insert - The elements to insert (e.g., table, report element, etc.) are accessed from the Insert section of the BO 4.3 toolbar.
- Refresh - Available on the BO 4.3 toolbar.
- Report - There are several options under this selection in BO 4.2:
- Show Structure / Show Results - Available on Main Panel > Show Report Structure; since this is a panel in BO 4.3, the Show Results option is no longer needed.
- Start Drill / Show Changes - Available in the More menu in the Analyze section of the BO 4.3 toolbar.
- Format Report - Available on Properties Panel > Report Element Format.
Options on both menus:
- Delete
- Edit Section
- Filter & Sort - Filter and Sort are under Data in BO 4.3.
- Hide
- Format Section
New BO 4.3 option:
- Copy Link of the Section
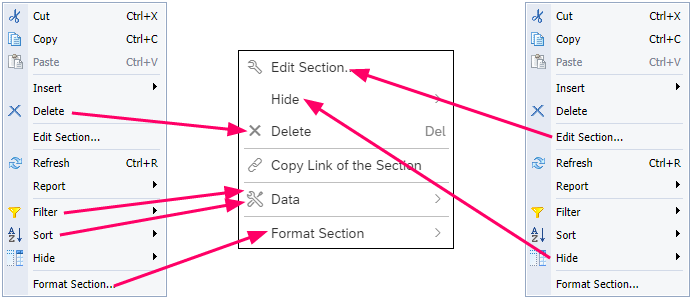
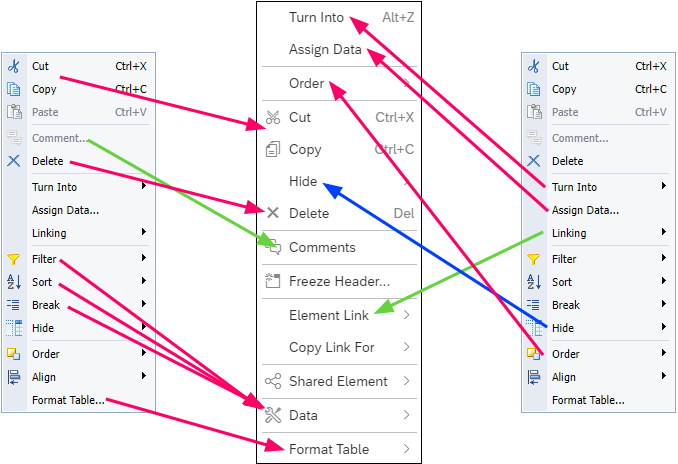
Table Contextual Menu
Options changed from BO 4.2 to BO 4.3:
- Align - Available on Properties Panel > Report Element Format > Layout Settings .
Options on both menus:
- Cut, Copy - Paste displays in the BO 4.3 menu if there is something on the clipboard that can be pasted.
- Comment
- Delete
- Turn Into
- Assign Data
- Linking - This is Element Link in BO 4.3.
- Filter, Sort & Break - These functions are under Data in BO 4.3.
- Hide
- Order
- Format Table
Cell Contextual Menu
Options changed from BO 4.2 to BO 4.3:
- Turn Into - Available on Properties Panel > Report Element Data > Feeding Panel
- Edit Formula - To see the current formula for a cell, click the Formula Bar in the Analyze section of the toolbar. The bar displays above the report. To access the Formula Editor, click Display Formula Editor on the Formula bar.
- Drill - Available in the More menu in the Analyze section of the BO 4.3 toolbar.
- Group - Available from the Main Panel > Document Objects ; click the More menu next to an object and select Manage Groups.
Options on both menus:
- Cut, Copy - Paste displays in the BO 4.3 menu if there is something on the clipboard that can be pasted.
- Comment
- Insert - The Count, Min, and Max options are under Footer Calculation on the BO 4.3 menu.
- Delete
- Merge
- Clear Contents - This is under Content in BO 4.3.
- Set as Section
- Linking - This is Hyperlink and Element Link in BO 4.3.
- Assign Reference
- Filter, Ranking, Sort & Break - These functions are under Data in BO 4.3.
- Hide
- Formatting Rules
- Format Number - This is Format Display in BO 4.3.
- Format Cell - This is Format Table Cell in BO 4.3. The Text formatting options are in Format Table Cell.
New BO 4.3 option:
- Footer Calculation - The Count, Min, and Max options are in the Insert menu in BO 4.2. This has been expanded to include Sum, Average, Percent, and Default Aggregation.
